NUWA Robot SDK Manual
ver 1.1.4
目次
- NUWA Robot SDKとは?
- 開発環境と関連資料
- 本ドキュメントの役割
- APKのインストール
- APIの初期化と終了
- コールバックの登録
- APIの開始手順
- モーションプレーヤー
- オーバーラップウィンドウコントロール
- ウェイクワードによる呼びかけ
- ローカル音声合成(TTS)
- ローカル音声認識(ASR)
- クラウド音声認識(ASR)とローカル音声認識(ASR)の混合
- センサーイベント
- LED制御
- サーボモーター制御
- 移動制御
- ロックホイールモード
- 落下イベント
- Face Control
- Custom Behavior
- Robot Service Recoveryのハンドリング
- ロボットメニューに、アイコンを追加する方法
- 音声コマンドでの呼び出し
- Q&A
NUWA Robot SDKとは?
NUWA Robot SDKは、NUWA Robotics 製のロボット(2019年11月現在、日本ではケビーのみ対応)用のアプリ開発キットです。Android Pをベースに動作しており、Android Studioを利用してアプリを作成することが可能です。
開発環境と関連資料
NUWA Robot SDKは、次の開発環境をサポートしています。
- Android Studio Archive Android Studio 4.1 October 12, 2020 (android-studio-ide-201.6858069.zip)
- Unity for Android
最新情報は、公式ホームページで公開しています。
- [公式ホームページ(英語)] https://www.nuwarobotics.com
NUWA Robot APIが含まれるAndroid Archive(aar)の他、サンプルコード、チュートリアルなどを提供しています。
- [NUWA Robot SDK Manual] NUWA Developer
- [NUWA Robot SDK aar] Download from NUWA Developer
- [NUWA Robot SDK JavaDoc] NUWA Developer
- [NUWA Robot SDK Example for Android] NUWA Github
- [Kebbi Motion list] NUWA MOTION
- [Kebbi Content Editor] NUWA Content Editor
NOTICE : Content Editor only for Business Partner, please contact nuwarobotics for more information.
※ 本ドキュメントは、NUWA Robot SDK Manualを日本語訳し、日本人向けにアレンジしたものです。最新のマニュアルについては、英語マニュアルを参照してください。また、初心者向けの日本語チュートリアルも合わせてご利用ください。
本ドキュメントの役割
本ドキュメントでは、NUWA Robot SDKの概要および、NUWA Robot APIの簡単な使い方を解説しています。APIの詳細につきましては、NUWA Robot SDK Javadoc を御覧ください。
APKのインストール
Androidの開発ツール(ADB)を利用して、アプリのapkをインストールすることが出来ます。ADBの接続にはパスワードが必要です。
- !Q@W#E$R
APIの初期化と終了
アプリを作成するには、"NUWA Robot API"のインスタンスを作成する必要があります。
// ID name: please naming your own client id, // Once mRobot is created, app will receive a callback of onWikiServiceStart() IClientId id = new IClientId("your_app_package_name"); NuwaRobotAPI mRobot = new NuwaRobotAPI(android.content.Context, id); // release Nuwa SDK resource while App closed.(or Activity in pause/destroy state) mRobot.release();コールバックの登録
NUWA Robot APIのすべての機能は、Android インターフェース定義言語(AIDL)をベースに、非同期で動作します。ロボットからの通知を受け取るために、コールバックを登録する必要があります。
ロボットのイベントを受け取るための RobotEventListener と、音声認識のイベントを受け取るためのVoiceEventListener が用意されています。
xxxxxxxxxx mRobot.registerRobotEventListener(new RobotEventListener() { public void onWikiServiceStart() { // Once mRobot is created, you will receive a callback of onWikiServiceStart() } public void onTouchEvent(int type, int touch) { } ....... }); mRobot.registerVoiceEventListener(new VoiceEventListener() { public void onTTSComplete(boolean isError) { // TODO Auto-generated method stub } ....... });ヘルパークラスを使用して、イベントの上書きも可能です。
xxxxxxxxxx mRobot.registerRobotEventListener(new RobotEventCallback() { public void onTouchEvent(int type, int touch) { } }); mRobot.registerVoiceEventListener(new VoiceEventCallback() { public void onTTSComplete(boolean isError) { } });APIの開始手順
NUWARobotAPI のインスタンス(mRobot)が作成されると、onWikiServiceStartのイベントが発生します。APIの呼び出しは、このイベントを受け取った後に行う必要があります。
xxxxxxxxxx mRobot.registerRobotEventListener(new RobotEventListener() { public void onWikiServiceStart() { // Once mRobot is created, you will receive a callback of onWikiServiceStart() } ....... }); // or check state by boolean isReady = mRobot.isKiWiServiceReady(); モーションプレーヤー
ロボットを動作させるためのアクションを定義した「モーションファイル」を再生することが可能です。モーションファイルはタイムラインで制御されています。MP4による動画再生、モーター制御、LED制御などの要素で構成されており、APIを利用して再生することで、ケビーに一連のアクションを実行させることが出来ます。
※一部のモーションは、MP4による動画再生を含みません(モーター制御のみで構成されています)。
motionPlay(final String motion, final boolean auto_fadein)
- motion: motion name, ex: 666_xxxx
- auto_fadein: If the motion includes Face, the param of "auto_fadein" needs to set as "true"
motionPlay(final String name, final boolean auto_fadein, final String path)
motionPrepare(final String name)
motionPlay( )
motionStop(final boolean auto_fadeout)
- auto_fadeout: stop playing a motion and hide the overlap window as well
getMotionList( )
motionSeek(final float time)
motionPause( )
motionResume( )
motionCurrentPosition( )
motionTotalDuration( )
xxxxxxxxxx /* will get callbacks of onStartOfMotionPlay onStartOfMotionPlay(String motion) while finish plaing, will get callbacks of onStopOfMotionPlay(String motion) onCompleteOfMotionPlay(String motion) // if there is an error, App will receive the error callback public void onErrorOfMotionPlay(int errorcode); */ // use default NUWA motion asset path mRobot.motionPlay("joyM_Ok", true/false); // give a specefic motion asset path (internal use only) mRobot.motionPlay("joyM_Ok", true/false, "/sdcard/download/001/"); // will get callback of onStopOfMotionPlay(String motion) mRobot.stop(true/false); // preload motion, and then playback // callback to onPrepareMotion(boolean isError, String motion, float duration) mRobot.motionPrepare("joyM_Ok") // pause, resume and seek mRobot.motionPause(); float pos = mRobot.motionCurrentPosition(); mRobot.motionResume(); mRobot.motionSeek(1.5f); // seek to 1.5 secモーションファイルは、あらかじめNUWAが用意したファイルと、ユーザーが独自に作成したファイルの2種類が存在します。NUWAが用意したファイルの一覧については、以下のドキュメントを参照してください。
[Kebbi Motion list] NUWA MOTION
モーションファイルの作成には、NUWAが提供している「コンテンツエディター」を利用できます。Webベースのアプリケーションで、タイムラインを利用して簡単にモーションファイルを作成することが出来ます。
[Kebbi Content Editor] NUWA Content Editor
- NOTICE :
Content Editoronly for Business Partner, please contact nuwarobotics for more information.
オーバーラップウィンドウコントロール
動画を含んだモーションファイルを再生する場合、標準の状態では、画面上部にオーバーラップウィンドウが表示されます。このウィンドウの表示をコントロールすることが可能です。
- showWindow(final boolean anim)
- hideWindow(final boolean anim)
xxxxxxxxxx mRobot.showWindow(false); mRobot.hideWindow(false);ウェイクワードによる呼びかけ
startWakeUp()を使用すると、ウェイクワード(「ハロー、ケビー」)による呼びかけを利用できます。アプリの実行中に、ユーザーから「ハロー、ケビー」と呼びかけられると、onWakeUpイベントが呼ばれます。
- startWakeUp(final boolean async)
- stopListen( )
xxxxxxxxxx mRobot.startWakeUp(true); // When Robot hear "Hello Kebbi",Kiwi agent will receive a callback onWakeup() of VoiceEventListener once onWakeup(boolean isError, String score) { // score: a json string given by voice engine // isError: if engine works normally // Ex: {"eos":3870,"score":80,"bos":3270,"sst":"wakeup","id":0} // score: confidence value } // stop listen to wakeup mRobot.stopListen();ローカル音声合成(TTS)
音声合成を利用して、ケビーに任意の文字列を発話させる事が可能です。
日本で発売しているケビーは、日本語と英語の2種類の音声合成が搭載されています。発話させる文章に日本語が含まれている場合は、文章全体を日本語の音声合成で発話します。
- startTTS(final String tts)
- startTTS(final String tts, final String locale)
- pauseTTS()
- resumeTTS()
- stopTTS()
xxxxxxxxxx mRobot.startTTS("Nice to meet you"); // you can cancel speaking at any time mRobot.stopTTS(); // or Used specific language speak (Please reference TTS Capability for market difference) // mRobotAPI.startTTS(TTS_sample, Locale.ENGLISH.toString()); // receive callback onTTSComplete(boolean isError) of VoiceEventListener onTTSComplete(boolean isError) { }TTS Capability (Only support on Kebbi Air)
xxxxxxxxxx* Taiwan Market : Locale.CHINESE\Locale.ENGLISH* Chinese Market : Locale.CHINESE\Locale.ENGLISH* Japan Market : Locale.JAPANESE\Locale.CHINESE\Locale.ENGLISH* Worldwide Market : Locale.ENGLISH
ローカル音声認識(ASR)
ASRエンジンの使用キーワードのリストを記述するSimpleGrammarDataは、アプリが最初にGrammarを作成する必要があります。 (命令リスト)
- createGrammar(final String grammar_id, final String grammar_string)
- startLocalCommand()
- stopListen()
基本的な例
xxxxxxxxxx //list listen syntax ArrayList<String> cmd = new ArrayList<>(); cmd.add("I want to listen music"); cmd.add("play pop music"); cmd.add("listen love song"); //Make Grammar Object by SimpleGrammarData class SimpleGrammarData mGrammarData = new SimpleGrammarData("TutorialTest"); for (String string : cmd) { mGrammarData.addSlot(string); } //update config mGrammarData.updateBody(); //Regist local ASR syntax mRobot.createGrammar(mGrammarData.grammar, mGrammarData.body); // stop ASR operation mRobot.stopListen();VoiceEventListener Callback
xxxxxxxxxx // receive a GrammarState callback of VoiceEventListener public void onGrammarState(boolean b, String s) { // now you can call startLocalCommand() API mRobot.startLocalCommand(); } // receive a Understand callback of VoiceEventListener public void onMixUnderstandComplete(boolean b, ResultType resultType, String s) { //Get ASR result string here String result_string = VoiceResultJsonParser.parseVoiceResult(s); }クラウド音声認識(ASR)とローカル音声認識(ASR)の混合
ローカルの音声認識(ASR)で認識結果が取得できなかった場合に、より認識精度の高い、クラウドの音声認識(ASR)を利用して音声認識の結果を取得することが出来ます。
- ローカル音声認識に成功した場合は、その結果を返却します(クラウド音声認識は実行しない)
- 失敗した場合は、クラウド音声認識を行い結果を返却します(インターネットが利用可能な場合のみ)
音声認識の結果は、json 形式の文字列として返却されます。
- startMixUnderstand( )
- stopListen( )
xxxxxxxxxx //list listen syntax ArrayList<String> cmd = new ArrayList<>(); cmd.add("I want to listen music"); cmd.add("play pop music"); cmd.add("listen love song"); //Make Grammar Object by SimpleGrammarData class SimpleGrammarData mGrammarData = new SimpleGrammarData("TutorialTest"); for (String string : cmd) { mGrammarData.addSlot(string); } //update config mGrammarData.updateBody(); //Regist local ASR syntax mRobot.createGrammar(mGrammarData.grammar, mGrammarData.body); // stop ASR operation mRobot.stopListen();VoiceEventListener Callback
xxxxxxxxxx // receive a callback of VoiceEventListener onGrammarState(boolean isError, String info) { // now you can call startMixUnderstand() API // do mix mode ASR mRobot.startMixUnderstand(); } // get local onMixUnderstandComplete(boolean isError, ResultType type, String json) { //Get ASR result string String result_string = VoiceResultJsonParser.parseVoiceResult(json); //get ASR type if (type == ResultType.LOCAL_COMMAND) { //do something } }センサーイベント
ケビーには、タッチセンサー、人感センサー(PIR)、落下防止センサーが搭載されています。これらのセンサーイベントは、リクエストにより有効になります。
- requestSensor(final int op)
- stopSensor(final int op)
x public static final int SENSOR_NONE = 0x00; //000000 public static final int SENSOR_TOUCH = 0x01; //000001 public static final int SENSOR_PIR = 0x02; //000010 public static final int SENSOR_DROP = 0x04; //000100 public static final int SENSOR_SYSTEM_ERROR = 0x08; //001000 // request touch sensor event mRobot.requestSensor(SENSOR_TOUCH); // or request touch, PIR event and SENSOR_XXX mRobot.requestSensor(NuwaRobotAPI.SENSOR_TOUCH | NuwaRobotAPI.ENSOR_PIR | NuwaRobotAPI.SENSOR_XXX); // get raw touch results of RobotEventListener // type: head: 1, chest: 2, right hand: 3, // left hand: 4, left face: 5,right face: 6. // touch: touched: 1, untouched: 0 onTouchEvent(int type, int touch) { } // type: head: 1, chest: 2, right hand: 3, // left hand: 4, left face: 5,right face: 6. onTap(int type) { } // type: head: 1, chest: 2, right hand: 3, // left hand: 4, left face: 5,right face: 6. onLongPress(int type) { } // get PIR results of RobotEventListener onPIREvent(int val) { } // stop all requested sensor event mRobot.stopSensor(NuwaRobotAPI.SENSOR_NONE); // stop multiple sensor events mRobot.stopSensor(NuwaRobotAPI.SENSOR_TOUCH | NuwaRobotAPI.SENSOR_XXX);LED制御
ケビーには、4つのLED(頭、胸、右手、左手)が搭載されています。ケビーが生きているように振る舞う「ブレスモード」と、プログラムからLEDを自由に制御するための「ライトオンモード」が用意されています。
デフォルトではシステムがLEDを制御しています。これを停止してアプリから制御するには、disableSystemLED を呼び出す必要があります。アプリが終了する前(アプリが onPause 状態になった時)に、enableSystemLED を呼び出すのを忘れないでください。
NOTICE : Kebbi-air not support FACE and Chest LED Breath mode.
- enableLed(final int id, final int onOff)
- setLedColor(final int id, final int brightness, final int r, final int g, final int b)
- enableLedBreath(final int id, final int interval, final int ratio)
- enableSystemLED() // LED be controlled by Robot itself
- disableSystemLED() // LED be controlled by App
xxxxxxxxxx/*id:1 = Face LEDid:2 = Chest LEDid:3 = Left hand LEDid:4 = Right hand LEDonOff: 0 or 1brightness, Color-R, Color-G, Color-B: 0 ~ 255interval: 0 ~ 15ratio: 0 ~ 15*/// turn on LEDmRobot.enableLed(1, 1);mRobot.enableLed(2, 1);mRobot.enableLed(3, 1);mRobot.enableLed(4, 1);// Set LED colormRobot.setLedColor(1, 255, 255, 255, 255);mRobot.setLedColor(2, 255, 255, 0, 0);mRobot.setLedColor(3, 255, 166, 255, 5);mRobot.setLedColor(4, 255, 66, 66, 66);// Switch to "Breath mode"mRobot.enableLedBreath(1, 2, 9);// turn off LEDmRobot.enableLed(1, 0);mRobot.enableLed(2, 0);mRobot.enableLed(3, 0);mRobot.enableLed(4, 0);
サーボモーター制御
ケビーには、10個のサーボモーターが搭載されています。APIを使用して、それぞれを制御することが可能です。
ctlMotor (int motor, float degree, float speed)
motorid:
- neck_y:1
- neck_z:2
- right_shoulder_z:3
- right_shoulder_y:4
- right_shoulder_x:5
- right_bow_y:6
- left_shoulder_z:7
- left_shoulder_y:8
- left_shoulder_x:9
- left_bow_y:10
degree : move degree (reference following angle range table)
speed : degree/sec speed
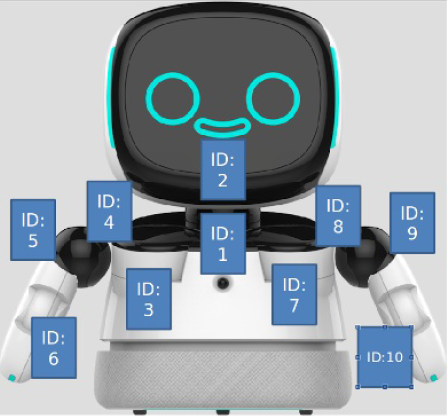
モーターには、それぞれIDが付与されています。これとは別に、移動用のホイールが床面に存在します。
[モーターの位置とID]
モーターの角度範囲
各モーターに設定可能な角度の範囲は以下のとおりです。
| ID | 1 | 2 | 3 | 4 | 5 | 6 | 7 | 8 | 9 | 10 |
|---|---|---|---|---|---|---|---|---|---|---|
| Max | 20 | 40 | 5 | 70 | 100 | 0 | 5 | 70 | 100 | 0 |
| Min | -20 | -40 | -85 | -200 | -3 | -80 | -85 | -200 | -3 | -80 |
x// control neck_y motor to 20 degree in 30 Degree/sec speedmRobot.ctlMotor(1, 20, 30f);
移動制御
ホイールを動作させて、ケビーを移動させることが可能です。前進、後退、旋回、停止の動作を行うことが出来ます。
Low level control:
- move(float val) max: 0.2(Meter/sec) go forward, min: -0.2(Meter/sec) go back
- turn(float val) max: 30(Degree/sec) turn left, min: -30(Degree/sec) turn right
Advanced control:
- forwardInAccelerationEx()
- backInAccelerationEx()
- stopInAccelerationEx()
- turnLeftEx()
- turnRightEx()
- stopTurnEx()
xxxxxxxxxx // go forward mRobot.forwardInAccelerationEx(); // go back mRobot.backInAccelerationEx(); // stop mRobot.stopInAccelerationEx();ロックホイールモード
充電ケーブルを接続している場合、「ロックホイールモード」が自動的に有効になります。アプリ内で unlockWhee を呼び出すことで、ロックホイールモードを無効にすることができます。
※充電ケーブルの破損には十分注意してください。
- lockWheel()
- unlockWheel()
落下イベント
ケビーが机の上などから落下した場合、イベントが発生します。RobotEventListenerのコールバックを利用して、このイベントを受け取ることが可能です。
- getDropSensorOfNumber()
xxxxxxxxxx// request Robot drop event firstmRobot.requestSensor(NUWARobotAPI.SENSOR_DROP);// handle itpublic void onDropSensorEvent(int value) {// value: 1 : drop0 : normal// get the amount of drop IR sensorint val = mRobot.getDropSensorOfNumber();}// release sensor eventmRobot.stopSensor(NUWARobotAPI.SENSOR_NONE);
Face control
Target SDK : 2.0.0.05 The robot face is constructed with the Unity engine. The face control mechanism receives instructions via android service AIDL. It will init and binding service when constructing the new NuwaRobotAPI object, use UnityFaceManager object to call face control instruction.
face control method:
- mouthOn(long speed)
- mouthOff()
- hideUnity
- showUnity()
- playMotion(String json,IonCompleteListener listener)
- registerCallback(UnityFaceCallback callback)
Example
xxxxxxxxxx --------------------------------------------------------------------------- // get control object UnityFaceManager mFaceManager = UnityFaceManager.getInstance(); --------------------------------------------------------------------------- /** * open face mouth method * @param speed : Mouth animation speed */ long speak = 300l; mFaceManager.mouthOn(speed); --------------------------------------------------------------------------- /** * close face mouth method */ mFaceManager.mouthOff(); --------------------------------------------------------------------------- /** * hide face method */ mFaceManager.hideUnity(); --------------------------------------------------------------------------- /** * show face method */ mFaceManager.showUnity(); --------------------------------------------------------------------------- /** * play unity face motion method * @param json : unity face motion key * @param mListener : callback for motion complete */ String json = "J2_Hug"; IonCompleteListener.Stub mListener = new IonCompleteListener.Stub() { public void onComplete(String s) throws RemoteException { Log.d("FaceControl", "onMotionComplete:" + s ); } }; mFaceManager.playMotion(json,mListener); --------------------------------------------------------------------------- /** * regist the callback that face status on touch * @param UnityFaceCallback : over write callback receive method */ mController.registerCallback(new UnityFaceCallback()); class UnityFaceCallback extends UnityFaceCallback { public void on_touch_left_eye() { Log.d("FaceControl", "on_touch_left_eye()"); } public void on_touch_right_eye() { Log.d("FaceControl", "on_touch_right_eye()"); } public void on_touch_nose() { Log.d("FaceControl", "on_touch_nose()"); } public void on_touch_mouth() { Log.d("FaceControl", "on_touch_mouth()"); } public void on_touch_head() { Log.d("FaceControl", "on_touch_head()"); } public void on_touch_left_edge() { Log.d("FaceControl", "on_touch_left_edge()"); } public void on_touch_right_edge() { Log.d("FaceControl", "on_touch_right_edge()"); } public void on_touch_bottom() { Log.d("FaceControl", "on_touch_bottom()"); } } ---------------------------------------------------------------------------Custom Behavior
- Target SDK : 2.0.0.05
- Nuwa Custom Behavior Example System behavior allows developer to customize response behavior of a NLP result. Developer need to setup Chatbot Q&A from NUWA Trainingkit website which allow developer setup Custom Intention for a sentence. Following sample code will present how to register receive this CustomIntentation notify and implement customize response.
class BaseBehaviorService
Developer should implement a class to determine how to react when receiving a customized NLP response from NUWA Trainingkit.
Nuwa Trainingkit Website This could be achieved by extending from class BaseBehaviorService. BaseBehaviorService declared three important functions which onInitialize(), createCustomBehavior() and notifyBehaviorFinished(). There are two functions need to be implemented which onInitialize() and createCustomBehavior().
onInitialize()
- When the extending class has been started, developer could initialize resource here.
createCustomBehavior()
- After that, the other function createCustomBehavior should create a CustomBehavior object. CustomBehavior is a interface which define custom behavior once receiving customized NLP result. It declared three callback functions for developer to implement customized behavior.
notifyBehaviorFinished()
- To notify robot behavior system that the process has been completed.
class ISystemBehaviorManager
This class has been encapsulated in BaseBehavior. Developer can get this instance which is created by BaseBehavior.
register(String pkgName, CustomBehavior action)
- Register a CustomBehavior object to robot behavior system by app package name.
unregister(String pkgName, CustomBehavior action)
- Unregister a CustomBehavior object to robot behavior system by app package name.
setWelcomeSentence(String[] sentences)
- To set welcome sentence when robot detected someone.
resetWelcomeSentence()
- To reset welcome sentence.
completeCustomBehavior()
- To notify robot behavior system that the process has been completed.
class CustomBehavior
The Object which let developer define how to to deal with customized NLP response.
prepare(String parameter)
- Once NLP response which is defined form TrainingKit has been reached, the robot behavior system will start to prepare resource for this session. The system notifies 3rd party APP and it could do something while preparing.
process(String parameter)
- Developer could implement his logic here to deal with NLP response which has been defined from TrainingKit. As robot behavior system is ready, this function call will be invoked. Note that the process might be an asynchronous task so that the developer must notify robot behavior system that the process when will be completed by notifyBehaviorFinished().
finish(String parameter)
- When this customized behavior has been completed, robot behavior system will clean related resources and finish this session. At the same time, it notifies the 3rd party app this session has been finished by this function call.
Sample code
xxxxxxxxxxpublic class CustomBehaviorImpl extends BaseBehaviorService { public void onInitialize() { handler = new Handler(Looper.getMainLooper()); try { // TODO initialize mSystemBehaviorManager.setWelcomeSentence(new String[]{"你好, %s.這是一個歡迎詞的測試!", "%s, 挖底家", "%s, 有什麼可以為您服務的嗎?"}); } catch (RemoteException e) { e.printStackTrace(); } } public CustomBehavior createCustomBehavior() { return new CustomBehavior.Stub() { public void prepare(final String parameter) { // TODO write your preparing work } public void process(final String parameter) { // TODO the actual process logic // TODO simulate asynchronous task while process complete handler.postDelayed(new Runnable() { public void run() { try { notifyBehaviorFinished(); } catch (RemoteException e) { e.printStackTrace(); } } }, 5000); } public void finish(final String parameter) { // TODO the whole session has been finished. } }; }}Robot Service Recoveryのハンドリング
Robotサービス(Robot SDK)が予期しない例外を発生すると、ケビーは自動的に再起動します。アプリはRobotEventListenerのコールバックを利用することで、シナリオの終了処理などを適切に行うことが出来ます。
xxxxxxxxxxpublic void onWikiServiceStart() {//1. Robot SDK is ready to use now.//2. Robot SDK restart successfully, and it's ready to use now.Log.d(TAG, "onWikiServiceStart");}@Overridepublic void onWikiServiceCrash() {// When Robot service(Robot SDK) happens unexpected exception, it will shutdown itself.Log.d(TAG, "onWikiServiceCrash");}@Overridepublic void onWikiServiceRecovery() {// Robot service(Robot SDK) begins to restart itself.// When it's ready, it will send "onWikiServiceStart" event to App again.Log.d(TAG, "onWikiServiceRecovery");}
ロボットメニューに、アイコンを追加する方法
マニフェストファイルに記載することで、ケビーのロボットメニューにアプリのアイコンを追加することが出来ます。
xxxxxxxxxx <application android:allowBackup="true" android:icon="@mipmap/ic_launcher" android:label="@string/app_name" android:roundIcon="@mipmap/ic_launcher_round" android:supportsRtl="true" android:theme="@style/AppTheme"> <activity android:name=".MainActivity" android:label="@string/app_name" android:theme="@style/AppTheme.NoActionBar"> <intent-filter> <action android:name="android.intent.action.MAIN" /> <category android:name="android.intent.category.LAUNCHER" /> </intent-filter> </activity> </application>音声コマンドでの呼び出し
マニュフェストファイルを設定することで、ケビーの音声コマンドから、アプリを呼び出す事ができるようになります。アクティビティを起動したり、インテントをブロードキャストしたりすることが可能です。
音声コマンドは、文字列の内容が100%マッチする必要があります。カンマ区切りで複数のコマンドを登録することができ、日本語の指定も可能です。
xxxxxxxxxxEx: in your manifest, add the "intent-filter" of "com.nuwarobotics.api.action.VOICE_COMMAND" in "activity" to identify the activity wants to be launched by Robot Launcher while Robot hears voice commands like [Play competition game,Play student competition game,I want play student game,student competition].<activityandroid:name=".YouAppClass"android:exported="true"android:label="App Name"android:screenOrientation="landscape" ><intent-filter><action android:name="com.nuwarobotics.api.action.VOICE_COMMAND" /></intent-filter><meta-dataandroid:name="com.nuwarobotics.api.action.VOICE_COMMAND"android:value="Play competition game,Play student competition game,I want play student game,student competition" /></activity>Ex: in your manifest, add the "intent-filter" of "com.nuwarobotics.api.action.VOICE_COMMAND" in "receiver" to identify the receiver wants to be launched by Robot Launcher while Robot hears voice commands like [I want to watch TV,I want to sleep,I want to turn on air conditioner].<receiver android:name=".VoiceCommandListener" ><intent-filter><action android:name="com.nuwarobotics.api.action.VOICE_COMMAND" /></intent-filter><meta-dataandroid:name="com.nuwarobotics.api.action.VOICE_COMMAND"android:value="I want to watch TV,I want to sleep,I want to turn on air conditioner" /></receiver>// in VoiceCommandListener.javapublic class VoiceCommandListener extends BroadcastReceiver{@Overridepublic void onReceive(Context context, Intent intent) {Log.d(TAG, "action:" + intent.getAction());if (intent.getAction().equals("com.nuwarobotics.api.action.VOICE_COMMAND")) {String cmd = intent.getStringExtra("cmd");Log.d(TAG, "user speak: " + cmd);}}}
Disable Support Always Wakeup
Kebbi-air support "Always wakeup" anywhere. (Kebbi and Danny only support wakeup on Face) We allow App declare on Application or Activity scope.
xxxxxxxxxxDeclare on AndroidManifest.xml<meta-data android:name="disableAlwaysWakeup" android:value="true" />
Application Scope Example
xxxxxxxxxx<applicationandroid:icon="@mipmap/ic_launcher"android:label="@string/app_name"android:theme="@style/AppTheme"><meta-data android:name="disableAlwaysWakeup" android:value="true" /></application>
Activity Scope Example
xxxxxxxxxx<activityandroid:name=".YouAppClass"android:exported="true"android:label="App Name"android:screenOrientation="landscape" ><meta-data android:name="disableAlwaysWakeup" android:value="true" /></activity>
How to call nuwa ui to add face recognition
App could call nuwa Face Recognition APP to add a face to system. Developer could lunch App by Intent and receive face-id and name from onActivityResult.
    private final int ACTIVITY_FACE_RECOGNITION = 1;

    private void lunchFaceRecogActivity() {
        Intent intent = new Intent("com.nuwarobotics.action.FACE_REC");
        intent.setPackage("com.nuwarobotics.app.facerecognition2");
        intent.putExtra("EXTRA_3RD_REC_ONCE", true);
        startActivityForResult(intent, ACTIVITY_FACE_RECOGNITION);
    }


    @Override
    protected void onActivityResult(int requestCode, int resultCode, Intent data) {
        super.onActivityResult(requestCode, resultCode, data);
        Log.d(TAG, "onActivityResult, requestCode=" + requestCode + ", resultCode=" + resultCode);
        if (resultCode > 0) {
            switch (requestCode) {
                case ACTIVITY_FACE_RECOGNITION:
                    mFaceID = data.getLongExtra("EXTRA_RESULT_FACEID", 0);
                    mName = data.getStringExtra("EXTRA_RESULT_NAME");
                    Log.d(TAG, "onActivityResult, faceid=" + mFaceID + ", nickname=" + mName);
                    lunchRoomListActivity(mName);
                    break;
            }
        } else {
            Log.d(TAG, "unexception exit");
        }
    }
Setup 3rd App as Launcher app to replace Nuwa Face Activity
Nuwa Face Activity is a Unity Activity to present kebbi face. We setup it as default HOME APP to make sure HOME Key can back to Nuwa Face Activity.
We allow Developer totally replace kebbi face by following implementation.
Step1 : declare 3rd App as a HOME APP.
  <intent-filter>
      <action android:name="android.intent.action.MAIN" />
      <category android:name="android.intent.category.HOME" />
      <category android:name="android.intent.category.DEFAULT" />
      <category android:name="android.intent.category.LAUNCHER" />
  </intent-filter>
Step 2 : Setup 3rd App as default HOME App.
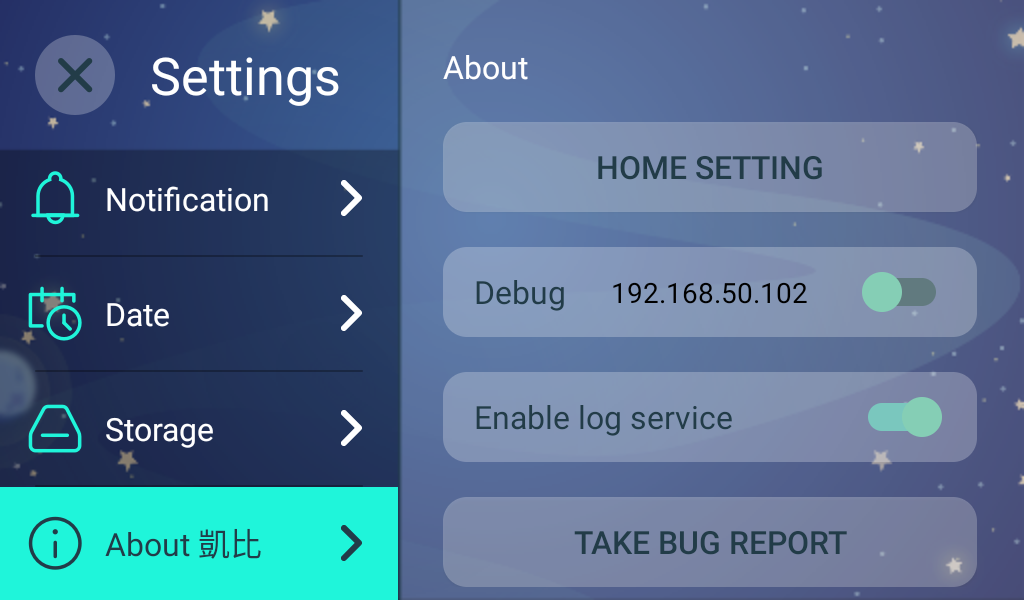
1. Open Setting
2. click "About Kebbi" 10 times to enable developer menu
3. click "Home Setting"(啟動器設定)
4. "Home app" (ホームアプリ) -> setup to your app
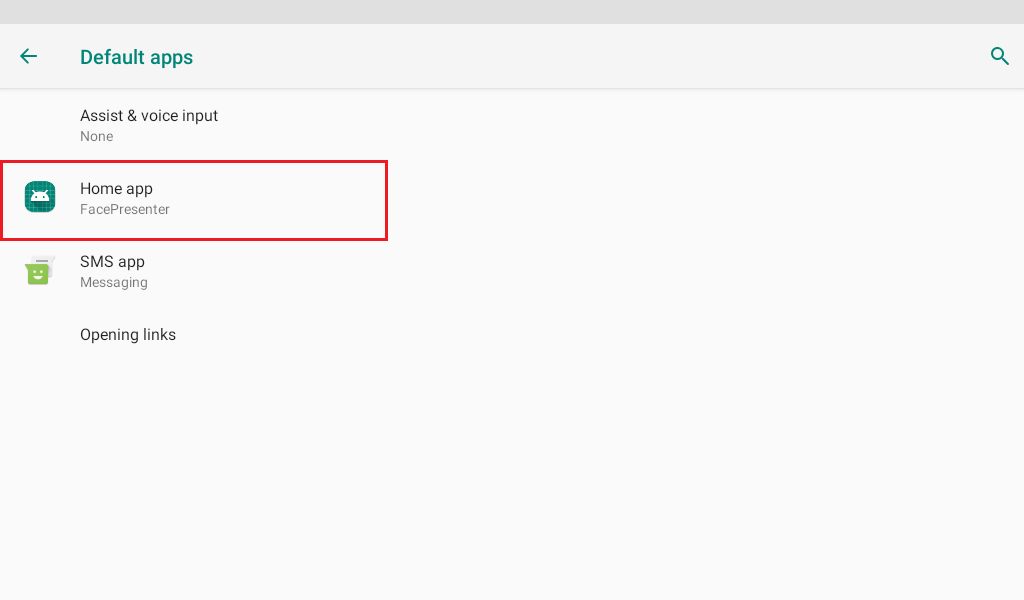
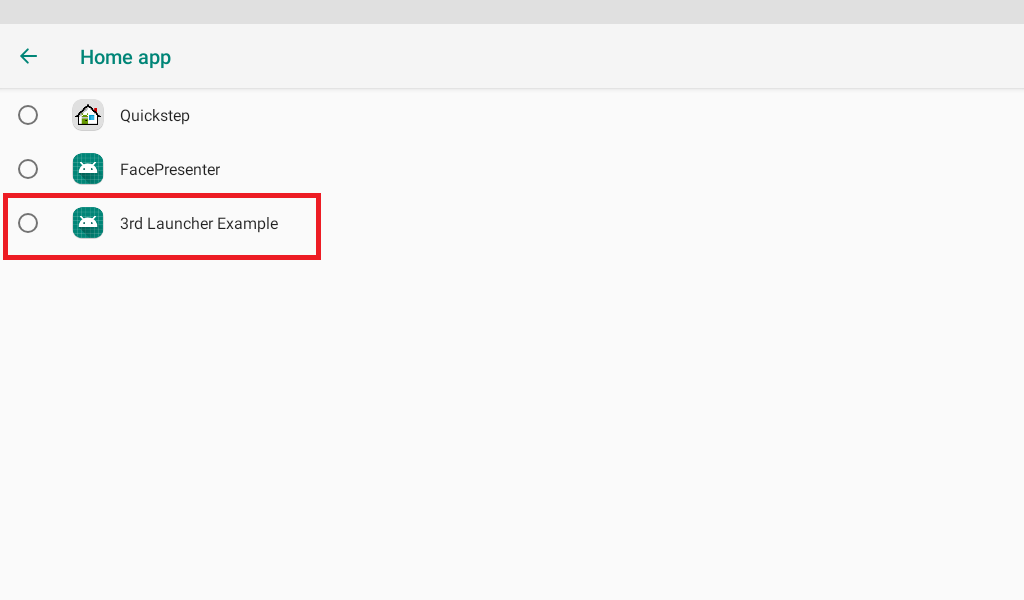
NOTICE : This setting will cause "Nuwa Face Activity" not always shown after HOME KEY pressed. You have to call Face Control API to trigger shown.
Prevent HOME KEY to suspend device
Some business environment request not allow user suspend device by press HOME KEY.
1. Open Setting
2. click "About Kebbi" 10 times to enable developer menu	1.
3. "Home screen key for locking screen" (ホーム画面のキーロック画面)
4. disable it to prevent goToSleep when press HOME Key on Nuwa Face Activity.
How to Auto Launch 3rd Activity when bootup
3rd App can declare following intent on Androidmanifest.xml.
Full Example:
<activity android:name=".CustomerAutoStartActivity">
    <intent-filter>
       <action android:name="com.nuwarobotics.feature.autolaunch" />
       <category android:name="android.intent.category.DEFAULT" />
    </intent-filter>
</activity>
Q&A
質問:
mRobot.motionPlayで指定したモーションが実行できません
回答:
- onErrorOfMotionPlay のコールバックをチェックして、エラー情報を確認してください
- モーション名が有効であることを確認してください
- モーションリストを確認し、正しいモーション名を指定してください
[Kebbi Motion list] https://dss.nuwarobotics.com/documents/listMotionFile
質問:
アプリからLEDを制御できません
回答:
- LEDを制御する前に、disableSystemLED を呼び出してください。例:onCreate 内に記述。
- アプリが終了する前に、enableSystemLED を呼び出す必要があります。例:onPause 内に記述。
質問:
ボタンなどを表示しても、タッチイベントを受け取れない場合があります。
回答:
オーバーラップウィンドウがすでに表示されている可能性が高いです。hideWindow(false)を呼び出して、オーバーラップウィンドウを非表示にしてください。オーバーラップウィンドウは、起動時には非表示になっていますが、モーションファイルの再生を行うと表示状態になります。 モーションの再生が終わると、onCompleteOfMotionPlay が呼び出されるので、この中でhideWindow(false)を呼び出してください。
質問:
音声認識(ASR)は、どの言語をサポートしていますか?
回答:
日本語と英語をサポートしています。
質問:
音声合成(TTS)は、どの言語をサポートしていますか?
回答:
日本語と英語をサポートしています。日本で発売しているケビーは、日本語と英語の2種類の音声合成が搭載されています。発話させる文章に日本語が含まれている場合は、文章全体を日本語の音声合成で発話します。
質問:
ロボットのタッチイベントが利用できません
回答:
- タッチイベントを利用する前に、mRobot.requestSensor(SENSOR_TOUCH)を呼び出してください。
- 次の例のように、コールバックでタッチ処理を行います
    mRobot.registerRobotEventListener(new RobotEventListener() {
        @Override
        public void onTouchEvent(int type, int touch) {
            // type: head: 1, chest: 2, right hand: 3, left hand: 4
            // touch: touched: 1, untouched: 0
        }
    });
※タッチイベントを終了する場合は、mRobot.stopSensor(NUWARobotAPI.SENSOR_NONE)を呼び出す必要があります。